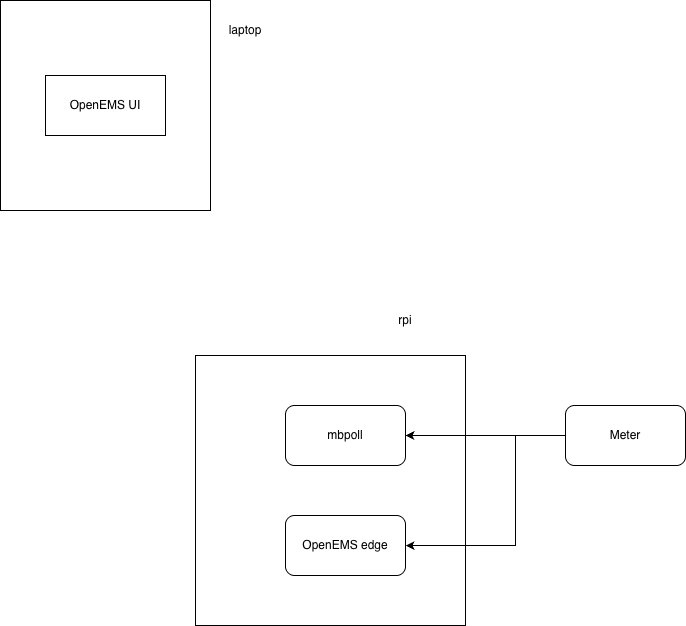
Running OpenEMS Edge on a Raspberry PI
Release 2025.11.0
This guide walks through running OpenEMS Edge on a Raspberry Pi and connecting it to an OpenEMS UI running as a Docker container on a separate machine over a local network.
The goal is a simple, reproducible local Edge + local UI setup suitable for development, simulation, and early deployments.
Architecture Overview
This setup consists of two main components connected over the internet:
-
Edge (Raspberry Pi)
Runs OpenEMS Edge as a systemd service and connects to the internet via Wi‑Fi. -
Client (Laptop / Desktop)
Runs the OpenEMS UI inside a Docker container. The UI may run on a different network (home, office, cloud VM).
Communication:
-
The UI communicates with the Edge via a WebSocket connection (default port 8085) over the public internet.
This means the Edge must be reachable via a public IP, port forwarding, or a secure tunnel.
Assumptions & Prerequisites
Before starting, ensure:
-
Raspberry Pi has working Wi‑Fi internet access
-
You have one of the following for remote access to the Pi:
-
Public IPv4 address with port forwarding, or
-
A static public IP, or
-
A secure tunnel (e.g. WireGuard, Tailscale, Cloudflare Tunnel)
-
-
Ports 80, 443, and 8085 are reachable from the Client
-
You have sudo access on the Raspberry Pi
-
Raspberry Pi OS is 64‑bit (ARM64)
Strong recommendation: For production or long‑running setups, use a VPN or tunnel instead of exposing ports directly.
Requirements
Hardware
-
Raspberry Pi–based Edge device
(e.g. SL-RP4 with embedded Raspberry Pi 4B) -
2 GB RAM (minimum)
-
16 GB micro-SD card + reader
Software / Dependencies
-
SSH
-
Rsync or WinSCP (Windows)
-
Raspberry Pi Imager
-
Docker Desktop
-
OpenEMS source code (release
2025.11.0) -
Adoptium OpenJDK Temurin 21 (ARM64)
Fresh Device Deployment
This guide uses headless setup only. No monitor or keyboard is required for the Raspberry Pi.
Format SD Card (Client)
Install and launch Raspberry Pi Imager, then select:
-
Device: Raspberry Pi 4
-
Operating System: Raspberry Pi OS Lite (64-bit)
(Debian Trixie – 2025-10-01) -
Storage: Target SD card
Click Next → Edit Settings.
These settings are written to the SD card and applied on the first boot.
OS Customisation — General
Mandatory:
-
Hostname
-
Username and password
-
Enable SSH
Required for this setup:
-
Configure Wi‑Fi SSID, password, and country
Also configure:
-
Timezone
-
Keyboard layout
OS Customisation — Services
Enable the following:
-
✅ Enable SSH (key-based auth recommended)
-
✅ Enable Raspberry Pi Connect
Raspberry Pi Connect allows secure remote access to the Pi over the internet, even behind NAT, without port forwarding.
Proceed to format the SD card.
Raspberry Pi Connect (Remote Access)
Raspberry Pi Connect provides a secure, browser-based and SSH-like remote access method for headless Raspberry Pi devices without exposing ports or requiring a VPN.
Why Use Raspberry Pi Connect
-
No monitor or keyboard required
-
Works behind NAT and firewalls
-
Secure, encrypted connection
-
Accessible from anywhere via a browser
Requirements
-
Raspberry Pi OS (64-bit)
-
Internet access via Wi-Fi
-
Raspberry Pi ID account
First Login via Raspberry Pi Connect
-
During first boot, ensure the Pi is connected to Wi-Fi
-
Sign in to Raspberry Pi Connect from another device:
https://connect.raspberrypi.com
-
Log in with your Raspberry Pi ID
-
Select your Pi from the device list
-
Open a remote shell or desktop session (if enabled)
Once Raspberry Pi Connect is active, SSH is optional but still recommended for automation.
While Formatting… (Client)
Clone the OpenEMS source code:
git clone -b 2025.11.0 https://github.com/OpenEMS/openems piDeployDemo
cd piDeployDemo
Build the UI-only Docker image:
docker build . -t openems_ui -f tools/docker/ui/Dockerfile.edge
Setting Up the Raspberry Pi (Edge)
-
Insert the SD card into the Raspberry Pi
-
Connect networking and power
-
Once the device boots, SSH into it:
ssh user@host-name.local
Create a working directory:
mkdir downloads
cd downloads
Checkpoint:
-
hostnamereturns the configured hostname -
ip ashows a LAN IP address
Installing Java & OpenEMS Edge (Edge)
Download OpenEMS Edge
wget https://github.com/OpenEMS/openems/releases/download/2025.11.0/openems-edge.jar
sudo chmod +x openems-edge.jar
Install Java (Temurin 21)
OpenEMS 2025.11.0 requires Java 21. Use Adoptium Temurin for ARM64 compatibility.
sudo -s
apt install -y wget apt-transport-https gpg
wget -qO - https://packages.adoptium.net/artifactory/api/gpg/key/public \
| gpg --dearmor | tee /etc/apt/trusted.gpg.d/adoptium.gpg > /dev/null
echo "deb https://packages.adoptium.net/artifactory/deb \
$(awk -F= '/^VERSION_CODENAME/{print $2}' /etc/os-release) main" \
| tee /etc/apt/sources.list.d/adoptium.list
exit
sudo apt update
sudo apt install temurin-21-jdk
Checkpoint:
java -version
Should report Java 21.
Set Up OpenEMS as a System Service (Edge)
Create directories:
sudo mkdir /usr/lib/openems
sudo mv openems-edge.jar /usr/lib/openems
sudo mkdir /etc/openems.d
Create the service definition:
sudo nano /etc/systemd/system/openems.service
Paste the following:
[Unit]
Description=OpenEMS Edge
After=network.target
[Service]
User=root
Group=root
Type=notify
WorkingDirectory=/usr/lib/openems
ExecStart=/usr/bin/java -Dfelix.cm.dir=/etc/openems.d/ \
-jar /usr/lib/openems/openems-edge.jar
SuccessExitStatus=143
Restart=always
RestartSec=10
WatchdogSec=60
[Install]
WantedBy=multi-user.target
Why this configuration:
-
felix.cm.direxternalizes configuration for persistence -
Restart=alwaysimproves resilience -
systemdensures Edge starts on boot
Reload and start the service:
sudo systemctl daemon-reload
sudo systemctl enable openems
sudo systemctl restart openems --no-block
journalctl -lfu openems
Checkpoint:
systemctl status openems
⚠️ WebSocket Configuration (Critical)
The UI will load even if the Edge is unreachable. You must explicitly enable and configure the WebSocket on the Edge.
Below is a minimal, explicit configuration to get the UI ↔ Edge connection working.
1. Create the WebSocket configuration (Edge)
On the Raspberry Pi:
sudo nano /etc/openems.d/io.openems.edge.websocket.cfg
Paste the following example configuration:
# Enable WebSocket API for UI connection
websocket.enabled=true
# WebSocket port (default)
websocket.port=8085
# Allow remote UI connections
websocket.allowedOrigins=*
Save and exit.
For production, restrict
allowedOriginsinstead of using*.
2. (Optional but Recommended) Verify Edge is listening
sudo ss -lntp | grep 8085
You should see Java listening on port 8085.
3. Restart OpenEMS Edge
sudo systemctl restart openems
Check logs:
journalctl -lfu openems
You should see messages indicating the WebSocket service started.
4. Connectivity Options (Internet Access)
Choose one of the following so the UI can reach the Pi:
-
Port Forwarding (Basic / Not Recommended for Production)
-
Forward external port
8085→ Pi internal port8085 -
Use your public IP or DNS name as
WEBSOCKET_HOST
-
-
VPN or Tunnel (Recommended)
-
WireGuard / Tailscale / ZeroTier / Cloudflare Tunnel
-
Keeps the Edge private while allowing secure access
-
For detailed simulation setup, see OpenEMS Getting Started, Section 5 (Steps 1–8):
https://openems.github.io/openems.io/openems/latest/gettingstarted.html#starting-a-simulation
OpenEMS UI Login (Client)
Start the UI by accessing:
http://localhost/login
Default password: admin
-
Change language via:
Top-left menu → Admin icon → “Sprache wählen” -
Refresh or use the back arrow to return to the overview
Create & Launch the UI Docker Container (Client)
Set WEBSOCKET_HOST to one of the following:
-
Public IP address of the Raspberry Pi
-
Public DNS name (recommended)
-
VPN / tunnel IP or hostname
Example using a public hostname:
docker container run \
-e WEBSOCKET_HOST=edge.example.com \
-p 443:443 -p 80:80 \
--restart unless-stopped \
--name openems_ui_container \
openems_ui
Why UI is Containerized but Edge Runs as a Service
In this guide, the OpenEMS UI runs in Docker while OpenEMS Edge runs as a native systemd service on the Raspberry Pi.
Why containerize the UI
-
The UI behaves like a web application: it’s comparatively portable and easier to run consistently across machines.
-
Docker makes it simple to package dependencies, run upgrades/rollbacks, and expose the UI via standard ports.
-
The UI typically needs only a small set of runtime settings (e.g.,
WEBSOCKET_HOST).
Why run Edge as a system service
OpenEMS Edge is closer to an appliance / gateway and is often more reliable when managed directly by the host OS:
-
Boot reliability:
systemdstarts Edge on boot and restarts it if it crashes. -
Hardware & networking access: Edge may need stable access to devices and networking (serial/USB/Modbus/etc.). Running directly on the OS avoids Docker-specific device mapping and networking edge cases.
-
Persistent configuration: Externalized configs in
/etc/openems.dare straightforward to manage and back up. -
Simpler troubleshooting: Standard Linux tooling works immediately (
systemctl status,journalctl).
When running Edge in Docker can make sense
-
You are running simulation only (no direct hardware I/O)
-
You already use container fleet management (e.g., docker-compose, k3s, balena)
-
You can standardize volumes, device mappings, and networking mode
Troubleshooting
-
UI loads but no Edge connection
→ Check public reachability of port 8085 -
Works on LAN but not remotely
→ Router port forwarding or firewall missing -
Public IP keeps changing
→ Use Dynamic DNS or a tunnel -
Connection drops frequently
→ Use VPN/tunnel instead of raw port forwarding
Security Notes (Important)
When exposing OpenEMS Edge over the internet:
-
Avoid running long‑term setups with raw port forwarding
-
Prefer WireGuard, Tailscale, or Cloudflare Tunnel
-
Consider TLS termination and authentication
-
Restrict SSH access (key‑based auth only)
This setup is suitable for remote development, pilots, and managed deployments.
No comments to display